From BAP to SC3urk for the Casual Designer
a few quick tricks that will bring out the best in your BAPs
This short sc3urk tip is about adding some shadows and contrast to your buildings - hope you will find it helpful.
First, you need four bitmaps [.bmps] of your already BAPped building. Many people can use the .bld to .bmp feature within the sc3urk program - mine hasn't worked in a year....so the four views of the motel were captured the old fashioned way, by hitting the print screen button, then pasted onto four separate layers on the 5x5 sc3urk template. This is actually not a bad thing to do with 5x5 buildings anyway, since the .bld to .bmp doesn't seem to work for anyone correctly at this size.
First step is to select the background color from each - that gray/beige color in BAP - and then remove it from each so you are left with simply the four building images.
Then, adjust the brightness/contrast of each view [roughly +10/+20] to ultimately make the building slightly less dull in appearance. This may be all that you want to do to bring your BAPs into a brighter, zippier world - it does make for a better appearance i think, but if not, read on...
The next step is called the "time to be an artist" step. Sounds scary i know, but hang in there - it's not that bad - all we're doing is adding some soft shadows. Now this is where your own artistic interpretation comes in - to calculate where and how each and every shadow should fall would take more time than you or i have or probably even want to have [and you probably don't have a 3D rendering program or a degree in mathematics anyway] What i do is treat these things as paintings not photographs or scientific formulas - it's fun that way - so what if it's not accurate.
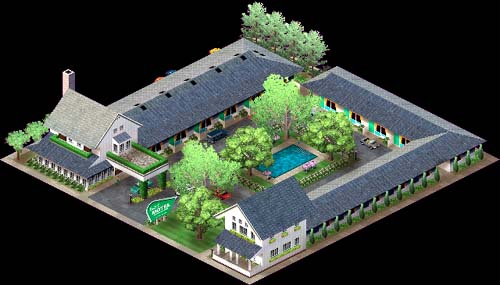
First, select the areas that should/could/might be roughly in shadow, by using the lasso tool and then feathering it by about 6 pixels. On another layer use the fill tool and fill in the selected areas with a dark maroon color - i just like this color - you can use any dark color, but i would avoid black - if you look at actual shadows, you will see a lot of color, very little black. Then set that layer's translucency to "multiply" with the layer below at about 33-50% - i did 50% in this case [this is in photoshop - i'm not sure what it is called in PSP - if someone does know, let me know and i will add it here] The result of that fill is what you see above - soft, loose, fuzzy shadows next to buildings and cars and other objects and under trees of course. You now have some depth you didn't have before.
Lastly, in order to not have fuzzy pink edges resulting from the feathered fill that may have fallen over the pink background, select the area around each building image, go back to the fill layer and then "cut" whatever might have spilled over the edges.
That's it - now save a copy of each image with its corresponding shadow layer over it as whatever you want [e5 motel 0, e5 motel 1, e5 motel 2 and e5 motel 3 - for example] You are done in your paint program - now open the sc3urk program and follow the steps to compile the images into a landmark or replacement building. The whole process really doesn't take that much time - after you get used to it - and it's worth it even if it does :)
If you have any questions about steps that might not be clear enough or are just plain seem to be missing, please let me know at the
Freeland Forum.
Ff
![exit 5 motel [BAPped]](https://fredfree0.tripod.com//sitebuildercontent/sitebuilderpictures/20020607e5motelbefore.jpg)